CMS:Wixストアのカテゴリーをどのページにも表示する
11分で読める
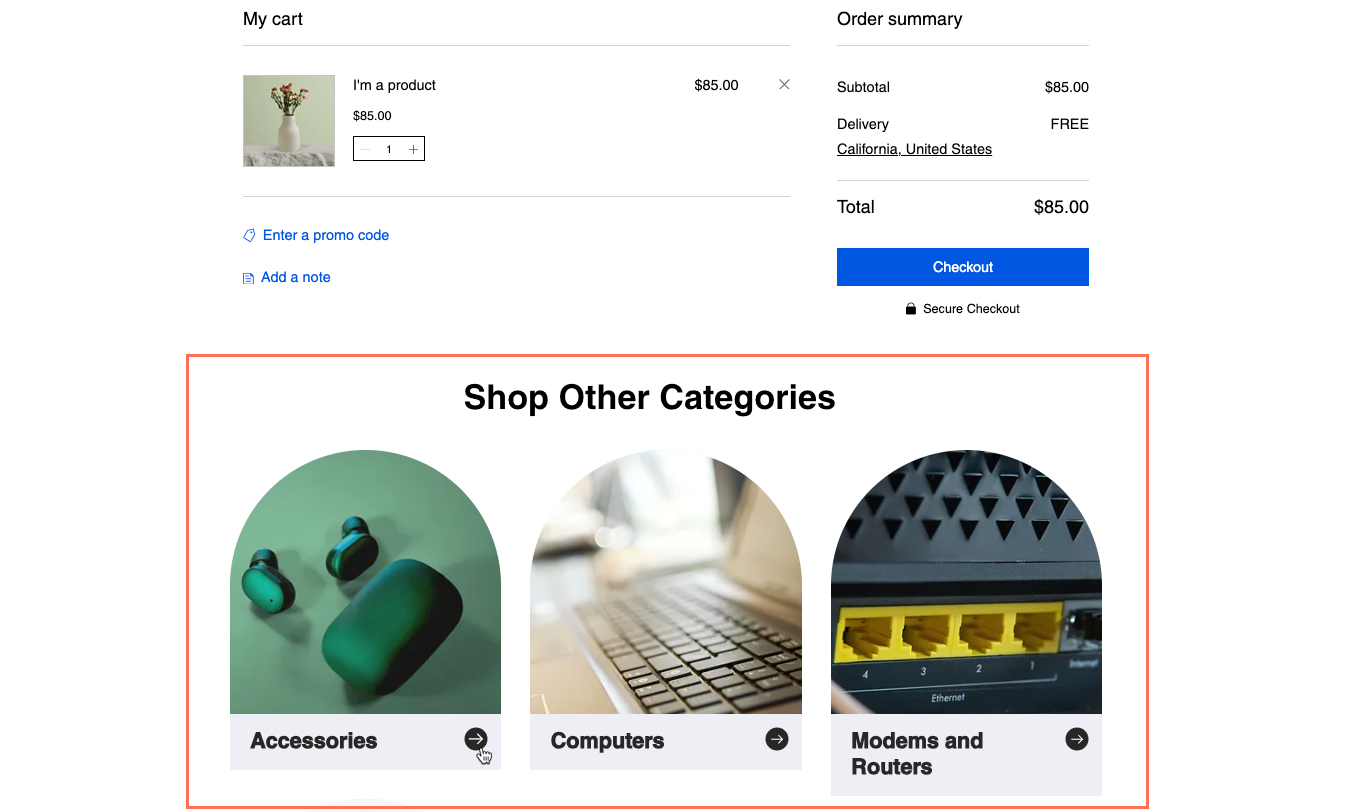
Showcase all your Wix Stores product categories in a gallery, repeater, or table on any page such as your Home or Cart page. When customers click a category, they go to the relevant Category Page where they can view its products. Alternatively, you can create a new dynamic list page to display your categories.
After connecting your gallery, repeater, or table to the CMS (Content Management System), you can use the dataset settings to choose which categories display. You can also control the order they display in and how many appear at a time.
重要だ:
You must have the new version of Wix Stores product categories to follow this tutorial. If you don't have it, learn how to manually create a gallery of categories with the original version of product categories.
始める前に
- Create multiple product categories in Wix Stores.
- Make sure to add the CMS to your site if you haven't already.
- Enable Wix app collections so you can use Wix Stores with the CMS.
Step 1 | Add a Pro Gallery, repeater, or table to a page
Go to the page in your Editor where you want to display your Wix Stores categories. If needed, you can add a new page. Then add the element you want to display your categories in.
Wixエディター
エディターX
スタジオエディター
- Go to your Editor.
- Go to the page or section where you want to display your Wix Stores categories.
- クリック エレメントの追加
 エディターの左側にある
 - Add a Pro Gallery, repeater, or table:
- Pro Gallery: Display your categories in a gallery:
- Click Gallery.
- Click and drag the Pro Gallery of your choice onto the page.
- Remove the default images from the gallery:
- Click the gallery and select Manage Media.
- Click Select All then click Delete.
- 完了をクリックする。
- Repeater: Display your categories using multiple elements attached to a repeater:
- Click List.
- Click and drag the repeater of your choice onto the page.
- Make sure your repeater has an image or button so you can link it to your Category Page later. You can add or remove elements from your repeater. If necessary, you can resize the repeater so it can fit all the elements you need inside it.
- Table: Display your categories in a table format:
- Click List.
- Click Tables and drag the table of your choice onto the page.
- Pro Gallery: Display your categories in a gallery:
Step 2 | Connect your gallery, repeater or table to the CMS
Connect the collection fields to your repeater, gallery or table. The values from these dynamic fields change on your live site depending on the category shown. Make sure to link the buttons or images to the Page URL. This link allows visitors to click to go to the relevant Stores Category Page.
Wixエディター
エディターX
スタジオエディター
- In your Editor, click the repeater, Pro Gallery, or table.
- をクリックする。 CMSへの接続 アイコン
 .
. - Click Create Dataset. If you already have a dataset on your page, click the Choose a dataset drop-down and select Create a New Dataset.
- Click the Choose a collection drop-down and select Collections under the Stores Wix app collection.
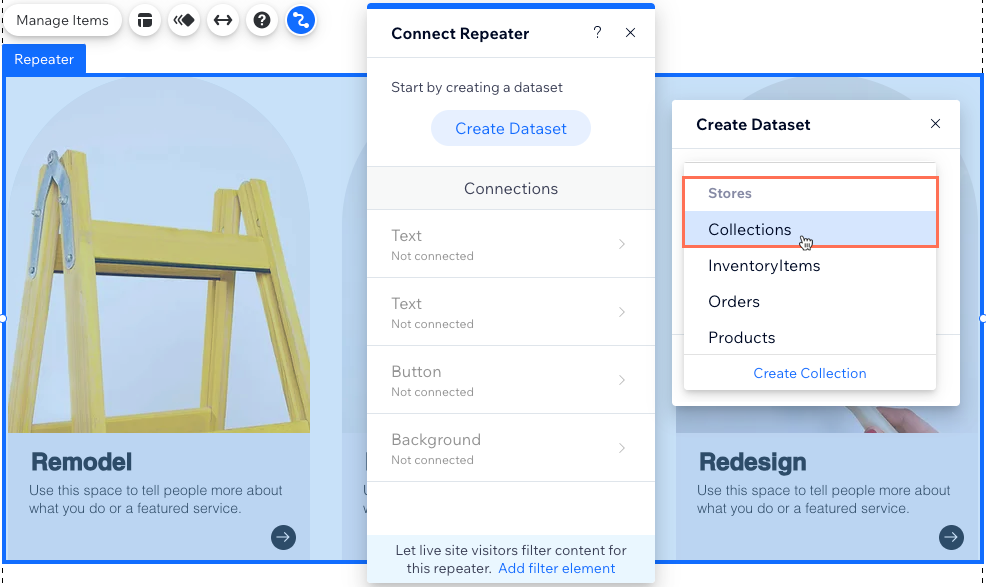
- (Optional) Click the Dataset name field and enter a name for the dataset.
- Click Create.
- (Repeaters only) Under Connections, click the repeater element you want to connect (e.g. Text, Button, Image).
- アンダー Connection options, click the relevant drop-downs and select the dynamic collection fields you want to connect:
- Name (Text): The category name set in Wix Stores.
- Main Media (Image): The category image set in Wix Stores.
- Slug (Text): The unique part of the URL at the end of your Category Page web address. You can set these by editing the SEO settings of each Stores category.
- ID (Text): The unique identifier code in the backend of each category.
- Navigate Page URL: The web address of the relevant Category Page. For buttons, click the Click action connects to drop-down to select Navigate Page URL. For images or the Pro Gallery, click the Links connect to drop-down to select Navigate Page URL.
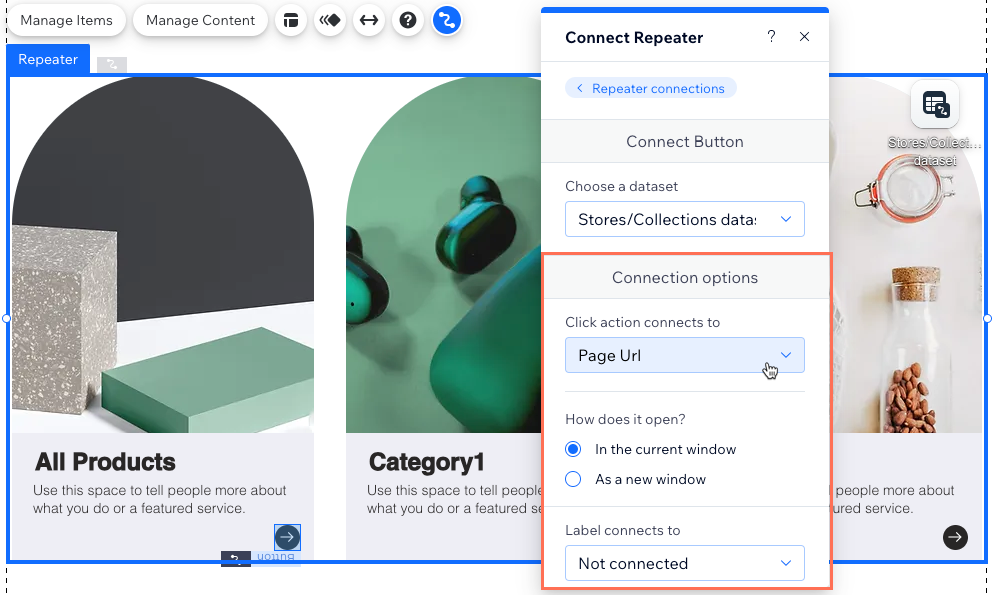
- (Repeaters only) Click Repeater connections and repeat steps 7-8 above to connect additional elements in the repeater.
- Click to adjust your repeater elements, Pro Gallery or table as needed.
Tip: You can add or remove elements from your repeater at any time. Disconnect elements if you want to use static content that doesn't change according to the relevant category. - Click Preview to test the functionality.
- 変更を公開する準備ができたら、「公開」をクリックします。
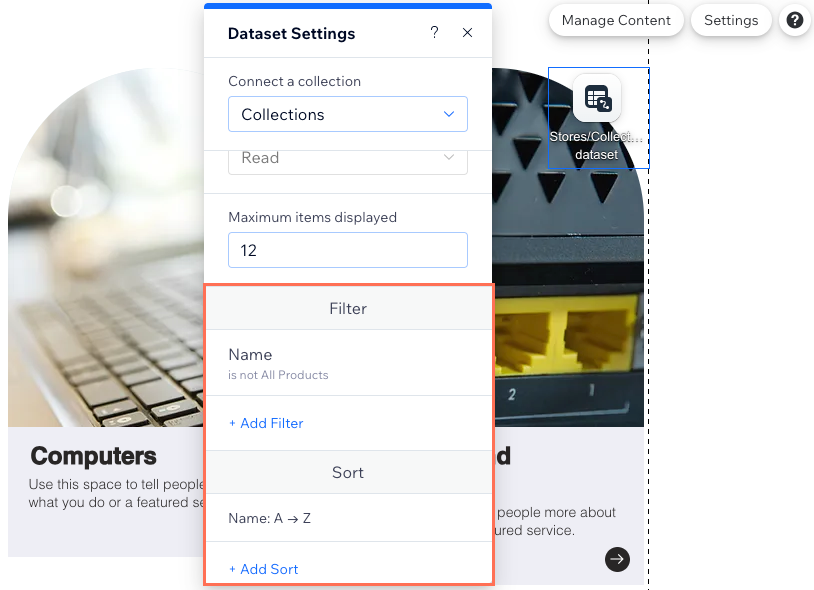
(Optional) Step 3 | Manage the dataset settings
In your dataset settings, you can choose the maximum categories that can display at a time. You can add filters to include specific categories or use sorts to control the category order.
注:
Tables are not affected by these dataset settings. Click Manage Table on the table element to manage the fields that appear and their order.
Wixエディター
エディターX
スタジオエディター
- Go to the dataset settings:
- クリック CMS
 左側
左側 - Click Manage Page Connections.
- をクリックする。 その他のアクション アイコン
 next to the relevant dataset and select Dataset settings.
- クリック CMS
- Edit the Maximum items displayed field to set the maximum number of categories that can load at a time on the page. This is also the maximum categories that can load per page in a connected pagination bar or per click in "Load More" and navigational buttons.
- (Optional) Click + Add Filter to only show specific categories in the element.
- (Optional) Click + Add Sort to choose the order in which the categories appear in the element.
- Click Preview to test the functionality.
- 変更を公開する準備ができたら、「公開」をクリックします。
これは役に立ったか?
|