Wix Automations: Sending Automated Emails to Contacts After Form Submissions
4 min read
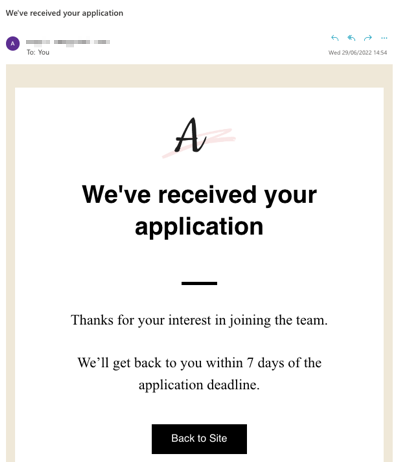
When a visitor submits a form, it can be helpful to automatically acknowledge that submission by sending an email. Within this email, you can outline next steps or provide further information.
For example, welcome new site subscribers by sending them a "thank you" email, or send a "next steps" email when a job application form has been submitted.
始める前に
The action of this automation is to send an email, so make sure your form includes an email field.
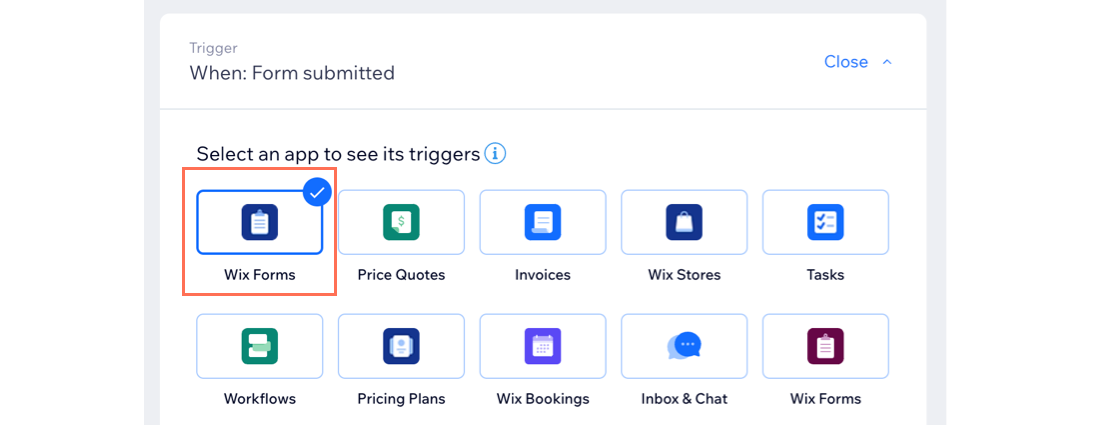
Step 1 | Choose a form to trigger the automation
Set up the trigger conditions associated with the automation you're building. Choose the Wix Forms trigger so form submissions on your site cause the automated action (sending an email) to occur.
To choose a form:
- Go to Automations in your site's dashboard.
- Click + New Automation.
- Click + Start from Scratch.
- Click the title to give your automation a name.
- In the Trigger section, click Wix Forms.
Note: When creating or editing an automation, you'll have two options for Wix Forms triggers. The blue icon sets a trigger for new Wix Forms and the red icon for old Wix Forms. Learn about old and new Wix Forms
- Select an option under Select a trigger:
- Option chosen on a form: The automation is triggered when a specific option within a form is chosen before being submitted.
- Click + Select under Select a form. Only forms with choice fields will appear.
- Click + Select under Select a field. The choice fields that appear include single choice, multi-choice, dropdown, and checkbox.
- Form submitted: The automation is triggered after a form on your site is submitted. Choose the relevant option under Select which forms trigger this automation:
- Any: All forms trigger this automation.
- Specific: Select which form(s) will trigger this automation.
- Option chosen on a form: The automation is triggered when a specific option within a form is chosen before being submitted.
- をクリックする。 Limit frequency to drop-down to set trigger frequency:
- Don't limit (trigger every time): Your action will take place every time it is triggered.
- Once per contact: Your action will take place only once per contact.
- Once per contact every 24hrs: Your action will take place only once per contact in any 24hr period.
- (Optional) Add a delay between a trigger and its action, to have the action occur after a certain amount of time passes.
- (Optional) Add a condition to make the automation occur when certain conditions are met.
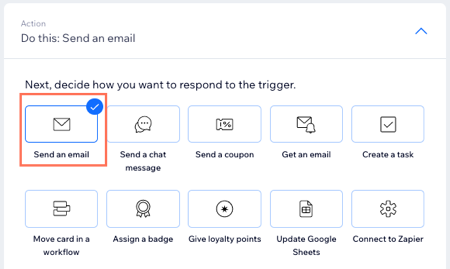
Step 2 | Set "Send an email" as your action
The action is what happens when your trigger condition is met. In this case, the trigger condition is a visitor submitting a form and the action is an email being automatically sent to that visitor.
Explore more actions
In addition to sending emails, you can automate sending coupons, creating tasks, updating contacts and more. Find out more about Wix Automations
To set "Send an email" as your action:
- In the Action section, select Send an email.
- (Optional) Edit your sender details:
- Click Edit in the Sender details drop-down.
- をクリックする。 その他のアクション アイコン
 をクリックしてください。 編集.
 - Enter your Sender's name そして Reply-to email address.
- Sender's name: Edit the name that appears in the recipient's inbox.
- Reply-to email: Edit the email address people reach when they hit reply.
- 保存をクリックする。
- Under Create an email, click Edit or Switch Template to create and personalize your email message.
- アンダー Set email type, select a type for your email to determine how or when your recipients can mute or unsubscribe from your emails:
- Promotional: Non-essential business information or marketing content. Recipients who have unsubscribed or muted the selected notification topic will not receive this email.
- Select from the drop-down menu which email notification topic a recipient can choose to unsubscribe from.
- Business transactional: Essential information to your customers, directly related to their activity on your site. Recipients who have muted the selected email notification topic will not receive this email.
- Select from the drop-down menu which email notification topic a recipient can choose to unsubscribe from.
- Business critical: Only meant for critical cases. Recipients cannot mute these emails and they will be sent regardless of any unsubscribe preferences.
- Promotional: Non-essential business information or marketing content. Recipients who have unsubscribed or muted the selected notification topic will not receive this email.
- アンダー Set recipients, select all who will receive this automated email when it's triggered:
- Include trigger contact: Recipient who triggered this automation.
- Include additional recipients: Additional recipients who didn't trigger this automation.
- Click Activate.
重要だ:
Make sure you are logged out of your Wix account before submitting a form to test an automation. If you are logged in when submitting a form, your email address and the test email address will become merged under the same contact.
これは役に立ったか?
|