Wix Automations: Customizing Automated Emails
読了目安: 6分
When creating an automation that sends an email, you can customize the email being sent. Write and design your email template, and send it from your preferred email address so recipients know who to reply to. Add dynamic values, for example to address your recipients by name, so your emails feel personal.
この記事では、その詳細について説明する:
Customizing the sender details attached to your email
Who do you want recipients to see as the sender of your emails? Use your business name so your message is recognized at first glance. Include a reply-to email that will route straight to the right inbox, so your customers can easily get in touch.
To set your sender details:
- Go to Automations in your site's dashboard.
- やりたいことを選択する:
- Create a new automation:
- Click + New Automation.
- Click + Start from Scratch or click Set Up next to a suggested automation.
- Edit an existing automation:
- をクリックする。 その他のアクション アイコン
 next to the relevant automation.
 - Click Edit.
- をクリックする。 その他のアクション アイコン
- Create a new automation:
- Click the title to give your automation a name.
- Select a trigger for your automation.
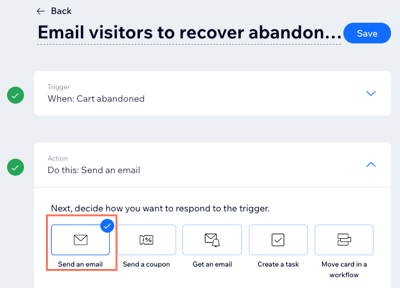
- Make sure Send an email is selected in the Action section.
- Scroll down to the Manage details section and click Edit.
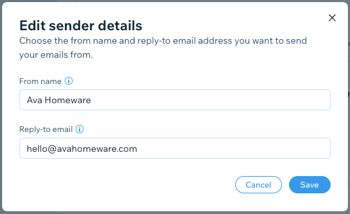
- (Optional) Edit your sender details:
- From name: Edit the name that appears in the recipient's inbox and click Save.
- Reply-to email: Edit the email address people reach when they hit reply and click Save.
- (Optional) Click Edit or Switch Template to create and personalize your email message.
- アンダー Set email type, select a type for your email to determine how or when your recipients can mute or unsubscribe from your emails:
- Promotional: Non-essential business information or marketing content. Recipients who have unsubscribed or muted the selected notification topic will not receive this email.
- Select from the drop-down menu which email notification topic a recipient can choose to unsubscribe from.
- Business transactional: Essential information to your customers, directly related to their activity on your site. Recipients who have muted the selected email notification topic will not receive this email.
- Select from the drop-down menu which email notification topic a recipient can choose to unsubscribe from.
- Business critical: Only meant for critical cases. Recipients cannot mute these emails and they will be sent regardless of any unsubscribe preferences.
- Promotional: Non-essential business information or marketing content. Recipients who have unsubscribed or muted the selected notification topic will not receive this email.
- アンダー Set recipients, select all who will receive this automated email when it's triggered:
- Include trigger contact: Recipient who triggered this automation.
- Include additional recipients: Additional recipients who didn't trigger this automation
- Click Activate.
Important information about the reply-to address:
- Automated emails sent from a public email service like Gmail or Yahoo tend to land in the spam or promotions category. It's better to use an authenticated address (e.g. you@yourbusiness.com).
- If you use a public domain address, Wix redirects your email through our own authenticated address. Don't worry, only your name and subject line appear in the inbox and readers' replies will go straight to your inbox.
- You may be asked to confirm your reply-to address. If so, you'll receive an email in your inbox with instructions.
Editing your email template
Make your automated email your own. Add text, images, videos and more to make it eye-catching and reflective of your brand. Add dynamic values for a personal touch (e.g. "Hi David, we noticed you left something in your cart").
To edit your email template:
- Go to Automations in your site's dashboard.
- Click + New Automation or click an existing automation to edit it.
- Select a trigger for your automation.
Note: Make sure you're happy with the automation trigger you've selected before designing your email. If you change your trigger, your email will return to the style and content of the default template. - Make sure Send an email is selected in the Action section.
- (If editing an existing automation) Click anywhere in the Action section to expand it.

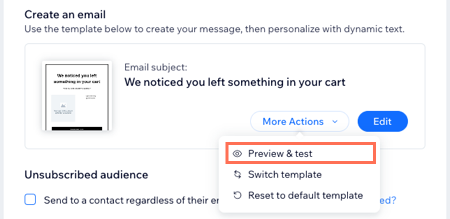
- Scroll down to the Create an email section and choose what you want to do:
- Click Edit to update the default template generated by this automation.
- Click the More Actions drop-down and select Switch template to use an email template from a different automation or email marketing campaign.

- Edit your chosen email template:
- Customize existing elements in the email.
- Add more elements to the email.
- 追加 dynamic values to personalize the email. Choose where you want to add personalized content:
- In the subject line of the email:
- Click Edit next to the subject.
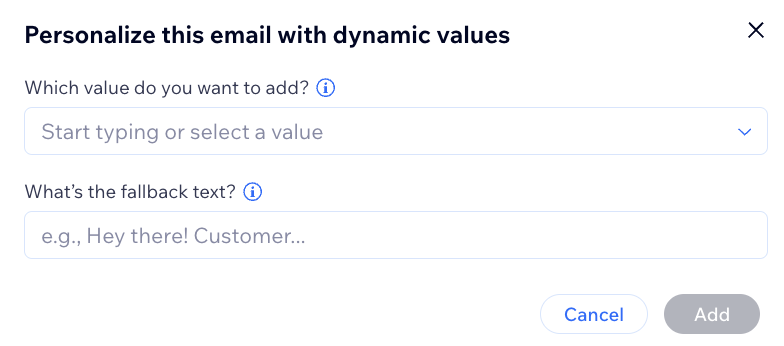
- Click + Personalize below the subject and select a value from the drop-down.
- Enter the fallback text that will be used in case there is no data available for the variable selected (e.g. add "valued customer" in case the customer's name is unknown).
- (Optional) Click the Preview text field and enter the text that appears after the subject line in the recipient's inbox. You can add dynamic values here as well.
- 保存をクリックする。
- In the content of the email:
- Click the relevant text field.
- Click + Add Personalized Content on the Customize text panel on the left.
- Select a value from the drop-down.
- Enter the fallback text that will be used in case there is no data available for the variable selected (e.g. add "valued customer" in case the customer's name is unknown).
- Click Add.
- In the subject line of the email:
- When you've finished customizing your email, click Save & Continue/Publish at the top right.
- (Optional) Click the More Actions drop-down and select Preview & test to generate a preview and send yourself a test version.
- Click Activate or Save to activate or save your automation.
よくある質問
Here are some common questions about customizing automated emails:
What is personalized content?
Can I send automated emails from different email addresses?
Can I see if people have received and opened my automated emails?
これは役に立ったか?
|