CMS:動的アイテムページの追加と設定
16分で読める
Use dynamic item pages to instantly produce an unlimited number of pages, each representing a different item from your CMS collection. The dynamic page acts as a template, with each collection item getting its own unique version and web address. You can customize the URL slug structure of your dynamic pages to keep them organized and ensure each item gets a unique URL.
Start by creating your dynamic item page, then design its layout by adding and arranging the elements. Connect the page elements, such as text and images, to your collection fields through the built-in dataset. As a result, each item's unique version of the page shows content from the item's collection fields.
We recommend pairing your collection's dynamic item pages with a dynamic list page that shows a catalog of your items in a repeater, gallery or table. When visitors click an item on the dynamic list page it takes them to the dynamic item page where they view details about the item.
始める前に
Create a CMS collection that includes the items that will each display in their own version of this dynamic item page.
Step 1 | Add a dynamic item page
Create a dynamic item page for your collection from the CMS panel in your editor. This adds the page that acts as a template for each item's unique version. Each version will share the same dynamic item page and simply swap out the details depending on the item.
Wixエディター
スタジオエディター
- 編集者のところに行ってください。
- クリック CMS
 エディターの左側にある
 - コレクションをクリックします。
- Hover over the relevant collection and click the その他のアクション アイコン
 .
. - Click Add dynamic page.
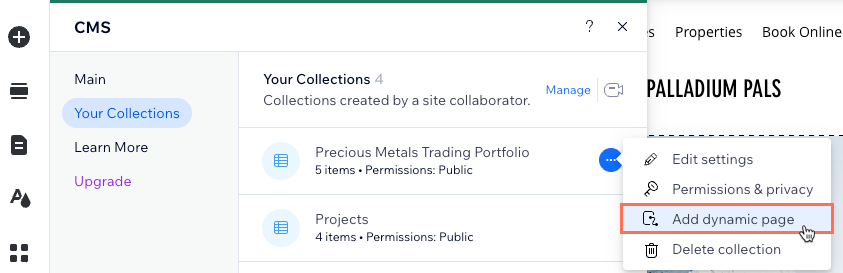
- Select Item page and click Add to Site.
Tip: Select List page as well to add a dynamic list page for the collection at the same time.
ステップ2|(オプション)URLスラッグ構造を修正する
You may want to edit the URL slug structure that determines the web addresses of your dynamic pages. This allows you to keep the URLs organized and structured in your own custom way.
たとえば、動的ページ用に次のようなURLスラッグ構造を作成することができます:
- Dynamic list page: https://www.{your-domain.com}/{collection-name}
- Dynamic category page: https://www.{your-domain.com}/{collection-name}/{category}
- Dynamic item page: https://www.{your-domain.com}/{collection-name}/{category}/{primary-field}
Make sure to create a URL slug structure for your dynamic item page that ensures each item has a unique URL. Without a unique URL, an item cannot have its own version of the dynamic item page. Learn more about creating unique dynamic page URLs.
When editing the URL slug structure, the structure cannot already be used by other existing pages on your site. To be unique, the URL slug structure cannot have the same prefix (e.g. {Collection name}) and the same number of variables as another page on your site, even if the variables are different.
使用できない競合するURLスラッグ構造の例を示してください。

重要だ:
動的ページのURLスラッグ構造を変更すると、これらのページへの既存のリンクはすべて機能しなくなります。これは、サイト内のリンク、外部で共有したリンク、検索エンジンのSEOリンクに影響します。私たちは、自動リダイレクトを追加し、訪問者と検索エンジンを古いURLから新しいURLに移動させる機能をリリースします。
To edit the URL slug structure of your dynamic item page:
Wixエディター
スタジオエディター
- 編集者のところに行ってください。
- クリック ページ&メニュー
 エディターの左側にある
 - ダイナミックページをクリックします。
- Hover over the dynamic item page you just created and click the その他のアクション アイコン
 右側
右側
ヒント By default, the dynamic item page you created is titled: {Collection Name} (Item) - クリックSEO。
- を編集する。 URLスラッグ構造 フィールドにいる:
- Add Variableをクリックし、URLスラッグ構造で値を使用するテキストまたは数値フィールドを選択します。
- URLスラッグ構造で静的な値を使用するには、テキストまたは数値を入力します。
- キーボードのEnter キーを押して、URLスラッグ構造の変更を保存します。

Step 3 | Connect page elements to the CMS
By default, your new dynamic item page includes elements, such as text and an image, that are automatically connected to your CMS collection fields.
Add and arrange the elements that you want to include in your dynamic item page. Then connect the elements to your CMS collection fields within the dataset if you want them to dynamically change based on the item. Leave elements disconnected from the CMS if you want their content to remain the same across each version.
You should also have default "Previous" and "Next" buttons that automatically take visitors to the previous or next item returned by the dataset. You can link an extra "Back" button to the collection's dynamic list page or another location that lists your items.
Wixエディター
スタジオエディター
- (Optional) Add elements to your page (e.g. buttons, text, images) or remove elements you do not need.
- Connect the elements on your page to your CMS collection:
Back button
 .
.  and select the relevant linking option if you want to link the button to another location.
Text elements

画像

Previous / Next buttons
ヒント
Learn more about the CMS connection options for each supported element.
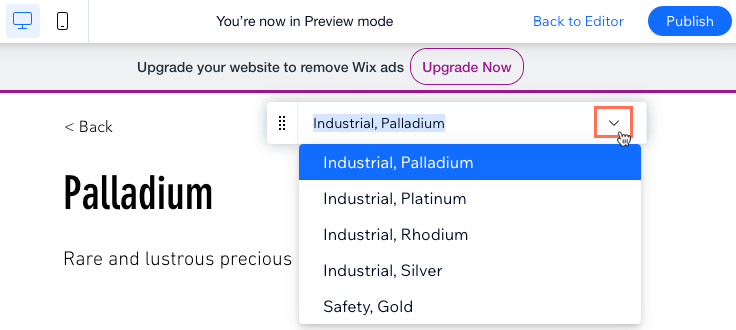
3. Click Preview and use the Preview toolbar to test each version of your dynamic item page.
4. Click Publish if you are ready to make the changes go live.
よくある質問
Click a question below to learn more about setting up dynamic item pages.
What is a dataset?
Can I link my site menu to specific dynamic item page URLs?
Can I show numerous images and videos on a dynamic item page?
Why should I add a variable field to the URL slug structure?
カテゴリー別に商品をリストアップする動的なページを作成できますか?
これは役に立ったか?
|