Wix Pay Links: Creating and Managing Pay Links in the Wix App
4 min read
Instantly request payments on the go using the Wix app. Share pay links via email, social media, SMS, or any of your phone's other native apps. You can also create a QR code for a pay link. Payments made via these links appear in your Wix account like all other transactions through your site.
始める前に
- You need to upgrade your site to use Pay Links. If your plan expires, your active pay links will be on hold. You'll be able to upgrade your Premium plan through the app if you're using Android. If you're using iOS, upgrade through desktop.
- In order to accept payments, you must set up a payment method. If you've already set up a payment method for Wix Stores, Wix Bookings or Wix Events, you do not need to set one up again.
この記事では、その詳細について説明する:
Creating and sending a pay link
Create a pay link and send it via any of your phone's native apps. You can also create a QR code that will bring users straight to your pay link when scanned.
To create and send a pay link:
- Go to your site in the Wix app.
- Tap 追加
 at the bottom.
 - Tap Create a pay link.
- Tap One-time payment to create a link that accepts one payment, or tap Multi payment to create a link that accepts multiple payments.
- Set up your pay link:
- Link Name: Enter a name for your pay link.
- 価格あなたの有料リンクが顧客に請求する金額を入力します。
- (Optional) Description: Enter a description for your pay link. This should clearly summarize the reason for payment.
- (Optional) Set an expiration date: Enable the Set an expiration date toggle. Set a date when the link will expire and cannot be used.
- (Optional, multi-payment only) Limit the number of payments: Enable the Limit the number of payments toggle to set the number of times the link can be used before it expires.
- (Optional) Customize link: Tap Customize link and set a button color, edit button text and upload an image. Tap Save.
- (Optional) Tap + Add Contact to select a contact to send your pay link to.
Note: Tap + Add Contact and then + Add New Contact to create a new contact. - Tap Preview and Share.
- Choose how to share your pay link:
- リンクをコピーリンクをクリップボードにコピーします。
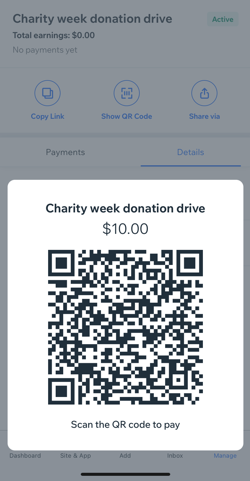
- Show QR Code: Display a QR code that when scanned will bring contacts to your pay link.
Note: Take a screenshot of this QR code to share it with contacts. - Share via: Share your link via one of your phone's native apps.
Managing your pay links
All of the pay links you create will be visible within your Wix app. You can share, activate, deactivate and delete pay links from here. You can also view details of each pay link and any payments made.
When you access your pay links, you'll see a status attached to each:
- Active: Your link is accepting payments.
- Inactive: Your link is not accepting payments.
Note: If your inactive link hasn't expired, you can change its status to active. - Paid: Payment has been made via this link.
- Expired: The expiration date you selected has passed and the link is no longer active.
To manage your pay links:
- Go to your site in the Wix app.
- Tap 管理
 at the bottom.
 - Tap Pay Links in the Get Paid section.
- Tap a pay link to view further details.
- やりたいことを選択する:
- (Active pay link only) Share your link: Tap Copy Link, Show QR Code or Share via/Resend.
- (Inactive pay link only) Activate your link: Tap Activate to activate your pay link.
- View payments: Tap the Payments tab to view all payments made.
- View pay link details: Tap the Details tab to view details of the pay link.
- Duplicate a link: Tap the More Actions icon
 and tap Duplicate to duplicate a pay link.
 - (Active pay link only) Deactivate or delete a link: Tap the More Actions icon and tap Deactivate または 削除 to deactivate or delete a pay link.
注: A pay link can only be deleted if no payments have been received.
これは役に立ったか?
|